
|
This information is from the point of view of a home canner and not endorsed by a state extension agency. To assure the latest and safest information, always check recipes and processes with a state extension site prior to use. |
 *If you haven’t read the blog about canning safety and botulism toxin, I highly recommend you do before you begin. It is important to understand safety concerns when preserving food and this is a good explanation why.* The first thing you learn in that article is to follow the rules. Use fresh, clean produce. Use clean, intact jars and lids. Follow the recipe - making sure it’s an approved one. And process the jars for the recommended time and temperature or pressure.
Jam is the chicken flock of the canning world - it’s easy to do, everyone loves it, and it usually leads to more difficult endeavors (think pigs or salsa). Because it is high acid, botulism doesn’t like to grow in it. And it is usually done with a hot water bath.
*If you haven’t read the blog about canning safety and botulism toxin, I highly recommend you do before you begin. It is important to understand safety concerns when preserving food and this is a good explanation why.* The first thing you learn in that article is to follow the rules. Use fresh, clean produce. Use clean, intact jars and lids. Follow the recipe - making sure it’s an approved one. And process the jars for the recommended time and temperature or pressure.
Jam is the chicken flock of the canning world - it’s easy to do, everyone loves it, and it usually leads to more difficult endeavors (think pigs or salsa). Because it is high acid, botulism doesn’t like to grow in it. And it is usually done with a hot water bath.
 Equipment
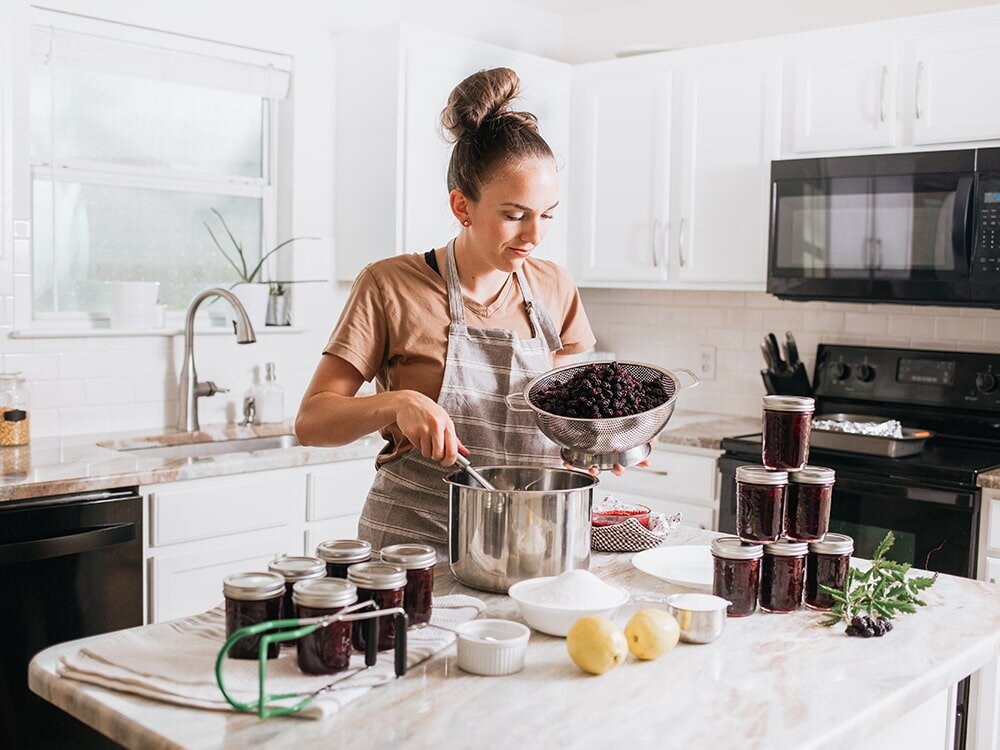
First we need to get the equipment. The easiest way to buy the right stuff is to buy a pot with a canning kit included. Generally this will have a large pot with a lid, a metal rack that fits inside the pot, a funnel, a jar lifter, a flat plastic stick, and a stick with a magnet on one end. We’ll talk about how to use the tools as we need them (and their fancy name if I can remember it). You can buy these items separately, but you really will use all of them so it’s easier just to buy the kit.
Equipment
First we need to get the equipment. The easiest way to buy the right stuff is to buy a pot with a canning kit included. Generally this will have a large pot with a lid, a metal rack that fits inside the pot, a funnel, a jar lifter, a flat plastic stick, and a stick with a magnet on one end. We’ll talk about how to use the tools as we need them (and their fancy name if I can remember it). You can buy these items separately, but you really will use all of them so it’s easier just to buy the kit. Blackberry Jam (with powdered pectin) - from National Center for Home Food Preservation
- 6 cups crushed berries - strawberries, raspberries, blackberries (about 3 quart boxes of berries)
- 1 package full sugar powdered pectin - it doesn’t matter what brand you use, but this recipe is for FULL sugar, not low-sugar. (Mrs. Wages Home Jell Fruit Pectin)
- 8½ cups sugar, granulated - this looks like a LOT of sugar, but you cannot change the amount and stay safe.
 Making Jam
- Measure 6 cups of crushed berries into a large saucepan. Use the rest for a fresh sauce over pancakes or ice cream.
- Add pectin and stir well. Place on high heat and, stirring constantly, bring berries to a full boil (the whole surface is bubbling).
- Add sugar, continue stirring, and heat again to a full boil. Boil hard for 1 minute stirring constantly. DO NOT WALK AWAY FROM YOUR JAM. It will boil over and make an incredibly sticky mess.
- Remove from heat. Use a large spoon to skin the foam off the top of the jam. It’s not necessary to get all of it, but try to remove as much as you can.
- Take a jar out of the hot water, pouring the water back into the pot. If the water is too hot to reach into, use the jar holder to pull the jar out. Place it on a towel on the counter. I do this for two reasons - one, you’re going to spill so the towel helps to keep things clean. And two, the wet jar doesn’t slip around.
- Place the funnel in the jar and fill it using a ladle or cup. The recipe says to leave ¼ headspace. This means you need about a ¼ inch between the top of the jam and the lid. But before you check headspace, you need to make sure there are no bubbles in the jam. To do this, slide the plastic stick down the inside of the jar and run it around the sides. This should dislodge any bubbles that might make it hard for the lid to seal.
- Now you can check the headspace. Using the same plastic stick, flip the stick around and use the notches. Each notch corresponds to a measurement, marked on the plastic. Setting the ¼ inch notch on the rim of the jar, check to see if it reaches the jam. Adjust the amount of jam until the notch just reaches the top of the jam.
- Wipe the rim with a wet paper towel. I like to dip the paper towel into the simmering water. Make sure there are no bits of food left as the lid won’t seal properly.
- Center a clean lid on the jar. Take a ring and screw it on finger tight. This is meant to keep the lid in place but doesn’t need to be overly tight as the lid will create a suction as it processes.
| Processing times for berry jam in a water bath canner. | ||||
| Process Times at Altitudes of… | ||||
| Style of Pack | Jar Size | Under 1000 ft | 1001-6000 ft | Over 6000 ft |
| Hot | Half-pint or pint | 5 minutes | 10 minutes | 15 minutes |
 Apple Pie Filling Recipe - from the Ball Blue Book Canning Guide
INGREDIENTS
makes 7 pints
12 cups sliced, peeled and cored apples
2-3/4 cups sugar
3/4 cup ClearJel® cooking starch
1/2 tsp ground cinnamon
1/2 tsp ground nutmeg
2-1/2 cups unsweetened apple juice
1-1/4 cups cold water
1/2 cup lemon juice
Apple Pie Filling Recipe - from the Ball Blue Book Canning Guide
INGREDIENTS
makes 7 pints
12 cups sliced, peeled and cored apples
2-3/4 cups sugar
3/4 cup ClearJel® cooking starch
1/2 tsp ground cinnamon
1/2 tsp ground nutmeg
2-1/2 cups unsweetened apple juice
1-1/4 cups cold water
1/2 cup lemon juice- Combine sugar, ClearJel®, cinnamon, and nutmeg in a large stainless-steel saucepan.
- Stir in apple juice and cold water.
- Bring to a boil over medium-high heat, stirring constantly. Cook until the mixture begins to thicken.
- Add lemon juice and boil for one minute. Continue stirring - sugar burns easily.
- Remove from heat. Add apple slices to the mixture and heat until the mixture just starts to boil again.
- Remove jars from hot water.
- Ladle hot apple pie filling into hot jars, leave one inch of headspace. Remove bubbles with the plastic stick. Measure headspace with notched end of plastic stick.
- Wipe rims with a damp paper towel.
- Place lids on the jars and tighten rings finger tight - just until you feel resistance.
- Process in boiling water according to the chart below.
| Processing times for apple pie filling in a water bath canner. | |||||
| Process Times at Altitudes of… | |||||
| Style of Pack | Jar Size | Under 1000 ft | 1001-3000 ft | 3001-6000 ft | Above 6,000 ft |
| Hot | Pints | 25 minutes | 30 minutes | 35 minutes | 40 minutes |
|
This information is from the point of view of a home canner and not endorsed by a state extension agency. To assure the latest and safest information, always check recipes and processes with a state extension site prior to use. |
We would love to see your canning projects, use #mywilcolife on Facebook, Twitter, or Instagram and tag Wilco Stores.
ROBYN ROGERS, THE AUTHOR OF THIS BLOG IS LOCATED ON THE KITSAP PENINSULA IN WASHINGTON AND HER ADVICE IS CONSISTENT WITH THE CLIMATE THERE.

Store Hours
Monday - Saturday 7am - 8pm, Sunday 9am - 6pm

For questions or help with online orders call: (888) 78-WILCO
Limited to stock on hand. Some items may vary from photos. Because of store size limitations or geography, some items featured may not be available in all stores but will be made available by special order during sale periods at advertised prices. All sale prices listed as “dollars off” or “% off” are discounted from our regular posted shelf price, not from discounts given with specialty, bulk or pallet pricing. Reseller and Drop-shippers must contact us for pre-approval to place orders with the intent to re-distribute.
© 2026, Wilco Farm Store