
|
This information is from the point of view of a home canner and not endorsed by a state extension agency. To assure the latest and safest information, always check recipes and processes with a state extension site prior to use. |
 But why does this matter? Well, botulism doesn’t die before 240 degrees. If we force water to boil at 250 degrees, the water content of our canning ingredients will boil at a higher temperature as well. This means the temperature will be high enough to kill botulism toxin. And that’s important for safety’s sake.
Before we move on, here’s a little science lesson about pressure canning. Here on Earth, we have an atmospheric pressure of 14.7 pounds per square inch (psi) at sea level. Because a pressure canner increases the atmospheric pressure of the contents within it (zero on the canner equals our regular psi), it can force water to boil at a higher temperature than in our typical atmosphere. In fact, instead of water boiling at 212 degrees, a canner can force it to boil at 250 degrees. So when we talk about pressure, we’re referring to atmospheric pressure.
*If you haven’t read the blog about canning safety and botulism toxin, I highly recommend you do before you begin. It is important to understand safety concerns when preserving food and this is a good explanation why.* The first thing you learn in that article is to follow the rules. Use fresh, clean produce. Use clean, intact jars and lids. Follow the recipe - making sure it’s an approved one. And process the jars for the recommended time and temperature or pressure.
But why does this matter? Well, botulism doesn’t die before 240 degrees. If we force water to boil at 250 degrees, the water content of our canning ingredients will boil at a higher temperature as well. This means the temperature will be high enough to kill botulism toxin. And that’s important for safety’s sake.
Before we move on, here’s a little science lesson about pressure canning. Here on Earth, we have an atmospheric pressure of 14.7 pounds per square inch (psi) at sea level. Because a pressure canner increases the atmospheric pressure of the contents within it (zero on the canner equals our regular psi), it can force water to boil at a higher temperature than in our typical atmosphere. In fact, instead of water boiling at 212 degrees, a canner can force it to boil at 250 degrees. So when we talk about pressure, we’re referring to atmospheric pressure.
*If you haven’t read the blog about canning safety and botulism toxin, I highly recommend you do before you begin. It is important to understand safety concerns when preserving food and this is a good explanation why.* The first thing you learn in that article is to follow the rules. Use fresh, clean produce. Use clean, intact jars and lids. Follow the recipe - making sure it’s an approved one. And process the jars for the recommended time and temperature or pressure.
Equipment
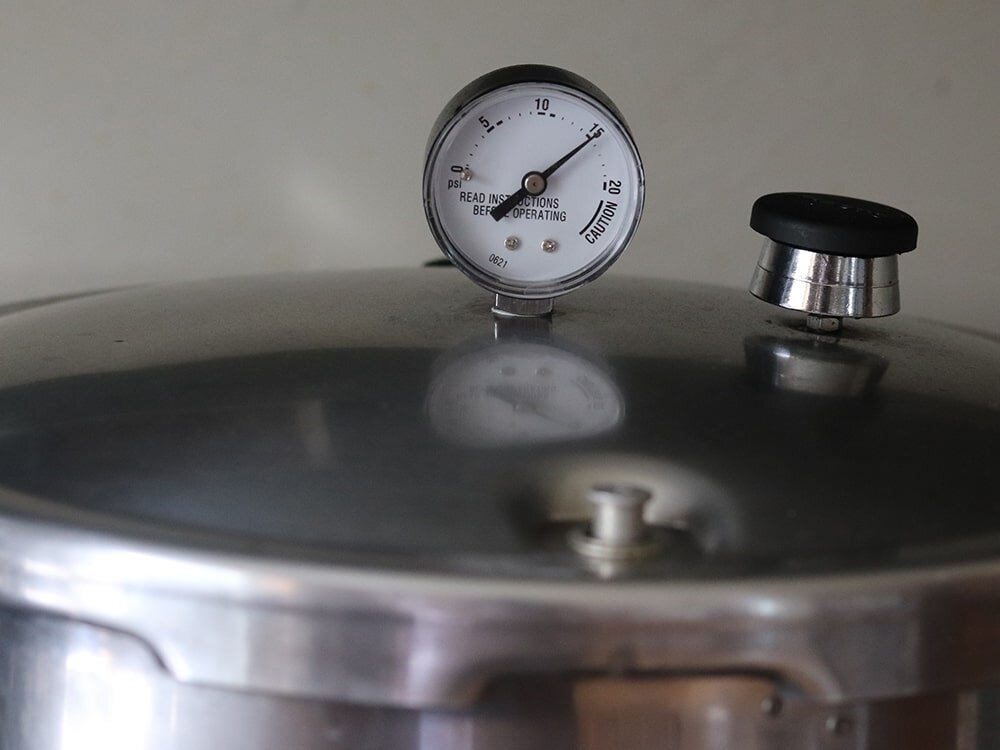
Pressure canners can be expensive. But they are wonderfully versatile and essential to canning meats, seafood, and vegetables. I encourage you to buy a pressure canner that can hold seven quart jars. It seems to me when I reach for a jar of stew meat, I want larger amounts to use at a time. Pints and half-pints just aren’t enough for a meal. But regardless of the size, the most important thing is to buy a quality canner. Pressure canners also have a pressure dial. The dial has a pointer which moves to indicate the pressure within the canner. When a recipe calls for a certain pounds of pressure, this is where you determine it. The standard recipes vary from 5 psi to 15 psi. It is important to have your pressure dial checked for accuracy each year. A gauge that reads high can cause under-processing and may result in unsafe food. You can check with your county extension office to have it tested. If you need to replace it, make sure to choose a dial that works with your pressure canner.
 In addition to the pressure canner, we need jars and tools. You can buy a set of tools that usually includes a jar lifter, a headspace/bubble stick, a funnel, and a magnetic stick. If you have tools for your hot water bath set up, you can use them for pressure canning. They are the same.
Most jars come with lids and rings. When you reuse your jars the next time, you can reuse the rings, but you’ll need new lids (to make sure you get a good seal). You can buy boxes of these separate from the jars. Quart jars come in “regular” and “wide mouth” openings. Your choice. I prefer the wide-mouth because the straight sides are easier to clean. They are all the same volume and that’s what matters.
In addition to the pressure canner, we need jars and tools. You can buy a set of tools that usually includes a jar lifter, a headspace/bubble stick, a funnel, and a magnetic stick. If you have tools for your hot water bath set up, you can use them for pressure canning. They are the same.
Most jars come with lids and rings. When you reuse your jars the next time, you can reuse the rings, but you’ll need new lids (to make sure you get a good seal). You can buy boxes of these separate from the jars. Quart jars come in “regular” and “wide mouth” openings. Your choice. I prefer the wide-mouth because the straight sides are easier to clean. They are all the same volume and that’s what matters.Set Up Equipment
Before we start preparing the beans, we need to set up the equipment. Put the pressure canner on the stove, making sure it is level. Put the rack and hot water into the canner. If the recipe doesn’t say how much water to use, best practice is 2-3 inches. It’s ok if the bottom of your jars are sitting in water. Wash and rinse jars and lids carefully. If they are used jars, check to make sure there are no nicks or chips in the rim. This could keep the lid from sealing properly. Since you aren’t boiling jars, their temperature doesn’t matter. The pressure canner will bring the temperature up slowly enough to protect the jars from cracking.
Green Beans
- 14 pounds of beans
- 7 tsp canning salt (Mrs. Wages Pickling & Canning Salt)
- Enough water to cover beans
Preparing the Beans
Sort and wash tender, but crisp pods. Remove and discard diseased or rusty pods. Trim ends. Leave whole or cut or snap into 1-inch pieces.Hot Pack
- Place prepared beans in a large pot. Fill with boiling water until the beans are covered. This gives the heating process a head start so we don’t cook the beans too much.
- Boil for five minutes.
- Using a slotted spoon, fill jars loosely with beans, leaving one inch of headspace. That means there are no beans within one inch of the lip of the jar.
- Add one teaspoon of canning salt per quart to the jar. Don’t worry about mixing it.
- Cover beans with hot cooking liquid, leaving one inch of headspace.
- Before you check headspace, you need to make sure there are no bubbles in the beans. To do this, slide the plastic stick down the inside of the jar and run it around the sides. This should dislodge any bubbles that might make it hard for the lid to seal.
- Now you can check the headspace. Using the same plastic stick, flip the stick around and use the notches. Each notch corresponds to a measurement, marked on the plastic. Setting the one inch notch on the rim of the jar, check to see if it reaches the liquid. Adjust the amount of water until there is about an inch between the beans/water and the lip of the jar. The reason for this is to allow for expansion within the jar while cooking. If you don’t leave enough headspace, you risk the contents leaking while cooking and disrupting the seal.
- Wipe the rim of the jar with a wet paper towel.. Make sure there are no bits of food left as the lid won’t seal properly.
- Center a lid on the jar. Take a ring and screw it on finger tight – until you feel resistance. This is meant to keep the lid in place but doesn’t need to be overly tight as the lid will create a suction as it processes.
Processing the Jars
As you complete each jar, use a jar lifter (the weird clamp-type thing), place them into the pressure canner. Make sure to always keep the jar upright. Tilting the jar can cause food to spill into the sealing area of the lid. Repeat this until all jars are full. When all of the jars are placed in the canner, place the lid on (it will only fit when sitting in the notches) and turn it until it locks in place. Sometimes it’s hard to get the lid in place but keep shifting it gently until it settles onto the pot. Remember, we have a seal to keep intact so don’t force it. Now that the pressure canner is locked, you can turn on the heat. Remove the pressure regulator and watch until you see a steady funnel of air coming out of the top of the open valve stem. This is called “venting” and it is essential for creating the proper pressure within the canner. Once you see the funnel of air, start the timer for ten minutes. When ten minutes have passed, replace the pressure regulator, and allow pressure to build within the canner. If you don’t do this, you risk having air trapped that is colder than the pressurized steam which can lead to under processed and potentially unsafe food. Unlike hot water bath canning, you aren’t watching for the water to boil. You are watching the pressure gauge. The amount of time for processing depends on the size of the jar, the contents, and the altitude (remember, altitude affects boiling). There is a chart below that explains the processing times. Follow the timing and psi that best fits your situation. For example, if you live at 4200 ft, you need to process quart jars at 13 lbs of pressure for 25 minutes.| Canner Pressure (PSI) at Altitudes of | ||||||
| Style of Pack | Jar Size | Process Time | 0 - 2,000 ft | 2,001 - 4,000 ft | 4,001 - 6,000 ft | 6,001 - 8,000 ft |
| Hot and Raw | Pints | 20 min | 11 lb | 12 lb | 13 lb | 14 lb |
| Quarts | 25 | 11 lb | 12 lb | 13 lb | 14 lb | |
Removing, Cooling, & Storing Jars
When the timer goes off, turn off the stove. The pressure regulator should slowly stop hissing and moving. The pressure gauge will show a decrease. This process can take some time - anywhere from 20-40 minutes. You will know the canner is safe to open when the locking pin disengages at the handle. Carefully open the canner. Remember, steam can burn just as easily as hot water. Allow the jars to sit in the canner for ten minutes before removing. Put a towel out on the counter. Using the jar lifter, lift each jar carefully out of the canner and onto the towel. Do not tip the jar. As the jars cool, you’ll hear this quiet “pop.” That’s the final sound of the vacuum sealing the lid. Let the jars cool for 24 hours. When they are cool, press down in the center of each lid. If the lid moves up and down, the jar isn’t sealed and should be refrigerated and used within the next week. If it doesn’t move, it is sealed. Remove the rings from the jars and wipe down any residue on the jar. Label each jar with the kind of beans and the date of processing - either a sticker or on the lid. Find a cool, dark, dry place to store the jars. Rule of thumb is you can keep canned goods for about a year. After that, while it’s still safe to eat, the contents will have degraded and may not be as tasty.
Chili Con Carne
from the National Center for Home Food Preservation Ingredients- 3 cups dried pinto or red kidney beans
- 5-1/2 cups water
- 5 tsp salt (separated)
- 3 lbs ground beef
- 1-1/2 cups chopped onion
- 1 cup chopped peppers of your choice (optional)
- 1 tsp black pepper
- 3 to 6 tbsp chili powder
- 2 qts crushed or whole tomatoes
Prepare Beans
Wash beans thoroughly and place them in a 2 qt saucepan. Add cold water until it is 2 to 3 inches above the beans. Soak for 12 to 18 hours. Drain and discard the water.Making the Chili
- Combine beans with 5 1⁄2 cups of fresh water and two teaspoons of salt. Bring to a boil. Reduce heat and simmer for 30 minutes. Drain and discard water.
- Brown ground beef, chopped onions, and peppers in a skillet. Drain off the fat.
- Add remaining three teaspoons of salt, pepper, chili powder, tomatoes and beans. Simmer for five minutes.
- DO NOT THICKEN. (It is unsafe to use thickening agents in canning. Remember - follow the rules: follow the recipe.)
Fill the Jars
- Ladle hot chili mixture into clean pint jars.
- Remove bubbles with the plastic stick and measure one inch headspace.
- Wipe rims with a damp paper towel.
- Place lids on the jars and tighten rings finger tight.
- Process in pressure canner according to the chart below. *Notice the processing time is much longer. This is important to ensure safety of preservation. Do not shorten.*
| Canner Pressure (PSI) at Altitudes of | ||||||
| Style of Pack | Jar Size | Process Time | 0 - 2,000 ft | 2,001 - 4,000 ft | 4,001 - 6,000 ft | 6,001 - 8,000 ft |
| Hot | Pints | 75 min | 11 lb | 12 lb | 13 lb | 14 lb |
|
This information is from the point of view of a home canner and not endorsed by a state extension agency. To assure the latest and safest information, always check recipes and processes with a state extension site prior to use. |
We would love to see your canning projects, use #mywilcolife on Facebook, Twitter, or Instagram and tag Wilco Stores.
ROBYN ROGERS, THE AUTHOR OF THIS BLOG IS LOCATED ON THE KITSAP PENINSULA IN WASHINGTON AND HER ADVICE IS CONSISTENT WITH THE CLIMATE THERE.

Store Hours
Monday - Saturday 7am - 8pm, Sunday 9am - 6pm

For questions or help with online orders call: (888) 78-WILCO
Limited to stock on hand. Some items may vary from photos. Because of store size limitations or geography, some items featured may not be available in all stores but will be made available by special order during sale periods at advertised prices. All sale prices listed as “dollars off” or “% off” are discounted from our regular posted shelf price, not from discounts given with specialty, bulk or pallet pricing. Reseller and Drop-shippers must contact us for pre-approval to place orders with the intent to re-distribute.
© 2026, Wilco Farm Store