Shopping at Pasco - Monday - Saturday 7am - 8pm, Sunday 9am - 6pm
PascoMonday - Saturday 7am - 8pm, Sunday 9am - 6pm

Food Preservation Methods: Canning, Dehydration, Curing & More
June 22, 2023
BBQ, Canning & Recipes
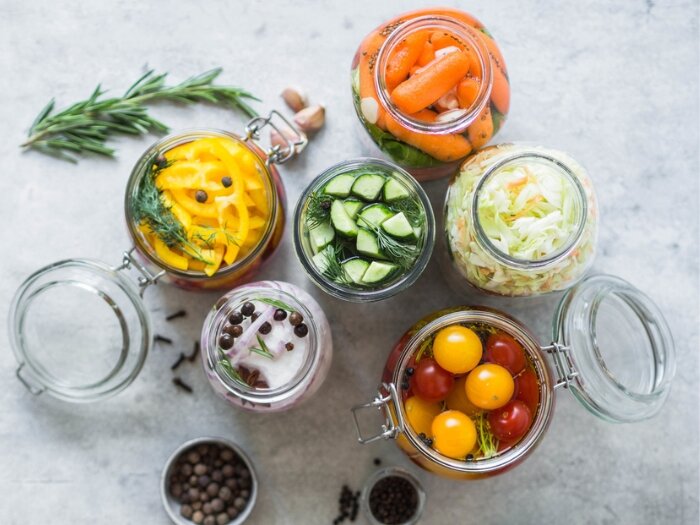
Food preservation is a practical, cost-effective, and sustainable way to manage our food supplies, reduce waste, save money, and make the most out of our groceries. Let's explore the various food preservation techniques available, their benefits, and how to choose the right method for your needs.

Benefits of Preserving Food
Preserving food offers numerous advantages beyond extending shelf life. Here are some reasons why home food preservation can be a game-changer for you:- Reducing Food Waste: Preservation helps minimize food waste by prolonging the lifespan of our groceries and utilizing every bit of produce we buy or grow.
- Saving Money: Preserving food allows us to take advantage of bulk purchases and seasonal produce, resulting in significant cost savings. It also reduces the need for last-minute takeout or convenience food purchases.
- Enjoying Seasonal Foods Year-Round: With preservation, you can enjoy your favorite seasonal fruits, vegetables, and even meats anytime, regardless of the season. Want a taste of summer strawberries in winter? No problem!
- Nutrient Retention: Some preservation methods, like freezing and dehydrating, can help retain most of the nutritional content of foods, aside from some volatile nutrients. That means you're not just storing food for a longer time but also locking in its nutritional value.
- Creating Unique Flavors and Textures: Many preservation techniques, like fermenting or pickling, impart unique flavors and textures to foods that can elevate your meals.
Food Preservation Methods: Pros and Cons
Let's explore a variety of food preservation techniques to extend shelf life, reduce waste, and enhance flavors and textures:Canning
Canning involves sealing food in airtight containers, usually jars, and heating them to kill microorganisms that cause food spoilage. It's great for preserving fruits, vegetables, and even meats. Pros: Canning can preserve food for up to one year. It also allows you to enjoy seasonal produce year-round. Cons: Canning requires some special equipment and careful procedure to ensure safety.Dehydration
Dehydration involves removing all the moisture from food, which inhibits bacterial growth, yeasts, and molds. Pros: Dehydrated foods are lightweight and suitable for backpacking or camping trips. They also have an extended shelf life, allowing for long-term storage. Cons: Some nutrients, particularly Vitamin C and A, are lost during the dehydration process.Curing
Curing is a traditional method of preserving and flavoring food, commonly used for meats. It involves the use of salt, sugar, and sometimes additional ingredients. Pros: Curing enhances the flavor and texture of meats, creating unique taste profiles. It extends the shelf life of food products, allowing for longer storage periods. Cons: Curing requires careful attention to proper curing methods and the correct use of curing agents. It may take longer preparation time compared to other preservation methods.Freezing
Freezing slows down the decomposition process by turning water into ice, inhibiting the growth of most bacterial species. Pros: Freezing retains most of the nutritional content of food and is suitable for many different types of food. Cons: Freezer burn can affect texture and flavor if food isn't packaged properly. Also, it relies on consistent electricity.Pickling
Pickling involves soaking foods in an acid solution, usually vinegar, and often in combination with salt or sugar. Pros: Pickles can last for a long time and can add a unique flavor to your meals. Cons: The process can sometimes soften the texture of the food.Fermenting
Fermentation uses bacteria, yeasts, or other microorganisms to convert sugars in food to other substances, such as alcohol or lactic acid, which act as natural preservatives. Pros: Fermented foods are packed with beneficial probiotics. Cons: Fermentation can be a bit unpredictable, and not everyone enjoys the sour taste.Choosing the Right Preservation Method
Choosing the right preservation method largely depends on the type of food you're preserving, your budget, and the intended length of storage.- Type of food: Different foods have unique characteristics and requirements for preservation. Consider the nature of the food you wish to preserve, such as fruits, vegetables, meats, or grains. Certain methods, like canning, drying, or freezing, may be better suited for specific food types.
- Equipment: Some methods require more investment in equipment than others. Freezing, for example, requires a good quality freezer and possibly vacuum sealing equipment, while canning requires jars and a canner.
- Intended storage period: If you plan to store food for a long time, methods like canning, drying, and freezing are more suitable. For shorter food storage periods, methods like refrigeration, pickling, and fermenting may be sufficient.
Safe Food Preservation Practices
Food preservation can come with risks if not done correctly. Here are some best practices for safe food preservation:- Cleanliness: Always ensure your hands, equipment, and workspaces are clean to prevent contamination. Wash and scrub fruits and vegetables before performing your chosen food preservation technique.
- Proper storage: Store preserved food in a cool, dry place away from sunlight. For preserved foods requiring refrigeration, ensure your refrigerator is set to the correct temperature.
- Follow reliable recipes: Especially when canning and fermenting, it's vital to follow tested recipes and procedures to ensure safety.
How to Can Food
 Canning is an effective way of preserving food for long periods of time. Depending on the type of food, it can be done using either a water bath canning method (for high-acid foods like fruits, jams, pickles, and certain tomato products) or a pressure canning method (for low-acid foods like most vegetables and all meats). Here's a general outline of the process:
- Place jars and lids in boiling water: Place the canning jars, rings, and lids in a large pot of boiling water for 10 minutes. This will help ensure they are sterilized correctly.
- Fill the jars with food: Carefully fill each jar with the prepared produce, leaving 1/2 inch headspace at the top.
- Add liquid and seasonings: If necessary, add a few tablespoons of liquid such as water or juice, along with any spices or seasonings.
- Seal the jars: Put the lids on each jar and tightly screw the rings in place.
- Process the jars: Depending on the type of food, use either a water bath or a pressure canner.
- Water Bath: Place the jars in a water bath canner and process them in boiling water for the amount of time specified in your recipe.
- Pressure Canner: Place the jars in a pressure canner and process at the pressure level and for the duration of time specified in your recipe.
- Allow jars to cool: Once processing is complete, remove the jars from the canner and let them cool on a wire rack. After the jars have cooled for about 12 to 24 hours, check the seals by pressing down on the center of each lid. If it doesn’t flex or make a popping sound, the jar is sealed.
- Store the jars: Check that they are sealed correctly before storing in a cool, dry place away from direct sunlight. Properly canned food can be stored for up to a year or longer.
How to Dehydrate Food
 Dehydrating is another way of preserving food for longer periods of time. Here's how to do it:
- Prepare the food: Clean your chosen food item and cut it into thin, even slices. This promotes even and efficient dehydration.
- Place the food on drying trays: Carefully place the prepared fruit or vegetable pieces onto dehydrator trays without pieces overlapping, leaving enough space between them for air to circulate.
- Set the temperature and timer: Set the temperature on your dehydrator to the recommended level, usually between 95-115°F (35-46°C) for most fruits and vegetables, while meats usually require higher temperatures. You can also set a timer if desired.
- Check the food periodically: Monitor the progress of your food as it’s drying. Depending on the type of produce you are dehydrating, the process may take anywhere from three to twelve hours. Rotate the trays if needed for even drying.
- Store the food: Once your food is completely dry and crispy, store it in an airtight container or vacuum-sealed bag away from direct sunlight and moisture.
How to Freeze Food
Freezing is an easy way of preserving food for longer periods of time. Here's how to do it:- Prepare the food: For many vegetables, blanching before freezing can be beneficial. This process involves briefly boiling the vegetables and then rapidly cooling them, which helps to kill bacteria, preserve the vegetables' color and flavor, and slow the enzymes that cause spoilage. However, some foods, like fruits and bread, can be frozen directly.
- Place the food into freezer bags: Carefully place the prepared produce into zip-top freezer bags or containers, squeezing out as much air as possible before sealing. Vacuum sealing is an excellent method for this stage, as it removes air, which can cause freezer burn and affects food quality.
- Label and date the bag: Clearly label each bag with the type of food and the date it was placed in the freezer.
- Place the bags in the freezer: Place each bag flat in the freezer to maximize storage space. This will also help speed up freezing time and maintain quality. Ensure that the temperature is set at or below 0º F (-18ºC) to maintain food quality.
- Defrost when needed: When you’re ready to use your frozen produce, simply defrost food in the refrigerator overnight or in cool water for several hours.
How to Pickle Food
Pickling is an ancient method of preserving food for longer periods of time. Here's how to do it:- Make the pickling liquid: Combine vinegar, salt, sugar, and your preferred spices to create a pickling brine. The ratio can vary based on your preference and the specific recipe, but a common starting point is equal parts water and vinegar.
- Submerge the food in the pickling liquid: Place the prepared produce into a non-reactive container, such as glass or ceramic. Pour the brine mixture over top and make sure all pieces are completely submerged. You can use fermentation weights or pickling pebbles to keep the food from floating to the surface.
- Store the food in a cool, dark place: Place the container in a cool, dark area—ideally between 55-60°F (13-16°C). Monitor daily to remove any pieces that may float to the surface and skim off any scum or foam at the top of the brine solution.
- Check the food periodically: After 7-10 days, check the produce for desired taste and texture. If it’s not quite there yet, leave it in the pickling liquid for another few days before tasting again.
- Store the food: Once your food is pickled to your liking, store it in an airtight container with some of the pickling liquid to preserve the flavor and keep it moist.
How to Ferment Food
Fermentation is an ancient form of food preservation and a great way to create probiotic-rich foods. It turns low-acid foods into high-acid foods, allowing you to preserve them for longer. Here's how to do it:- Create a brine solution: A 2-3% brine solution, which equates to about 1-2 tablespoons of salt per quart of water, is usually sufficient for many vegetables. Dissolve the salt into the water to create your brine.
- Place the food in a fermentation vessel: Place the prepared produce into a clean jar or fermentation vessel, making sure to add a layer of the brine solution between each piece.
- Cover and ferment: Place a lid or weight onto the jar to keep the food submerged in the brine. Allow it to ferment at room temperature—ideally between 68-72°F (20-22°C)—for at least 7 days, monitoring it daily. Depending on the produce and desired taste, fermentation can take anywhere from 7-14 days.
- Store the food: Once your food is fermented to your liking, store it in an airtight container with some of the brine solution in the refrigerator. This will help to keep it flavorful and moist.
How to Cure Food
 Curing is a traditional method of preserving food that involves using salt, sugar, and sometimes other ingredients to enhance flavor and extend shelf life. This process is commonly used for preserving meats, particularly pork, bacon, and fish. Here's a step-by-step guide on how to cure food:
- Prepare the food: Start by cleaning and preparing the food you want to cure. Remove any excess fat, bones, or undesirable parts. Rinse the food thoroughly under cold water to remove any impurities.
- Choose the right curing ingredients: Curing typically involves a mixture of salt and sugar, which can be combined with various spices and seasonings to enhance the flavor. You can use a pre-made curing mix or create your own blend according to your taste preferences.
- Apply the curing mixture: Evenly coat the entire surface of the food with the curing mixture. Rub it into the meat, ensuring all sides are thoroughly covered. The curing mixture draws out moisture from the food, preserving it and imparting flavor.
- Store the cured food: Place the cured food in a non-reactive container, such as a glass or ceramic dish, or a food-grade plastic bag. Make sure to remove any excess air and tightly seal the container or bag to prevent moisture loss.
- Refrigerate or cold-store: Depending on the curing method and recipe, you may need to refrigerate the food or cold-store it in a cool, controlled environment. Curing times can range from a few days to several weeks, depending on the size and type of food being cured.
- Flip and massage: During the curing process, flip the food periodically to ensure the curing mixture is distributed evenly. Additionally, gently massage the meat to enhance the penetration of the curing ingredients.
- Monitor the curing process: Check the food regularly to ensure it is curing properly. Depending on the recipe, you may notice changes in texture, color, and firmness. Follow the recommended curing time provided in the recipe or guidelines.
- Rinse or air-dry (if desired): After the curing process is complete, you can rinse the food under cold water to remove excess curing mixture and reduce the saltiness if desired. Alternatively, you can allow the cured food to air-dry for a period of time to develop a desirable outer crust.
- Storage and consumption: Once the curing process is finished, store the cured food in airtight containers or wrap it tightly in plastic wrap or wax paper. Keep it refrigerated or in a cool, dry place, depending on the specific cured item. Properly cured and stored food can last for an extended period, providing you with flavorful preserved options.
From Fresh to Preserved
 Food preservation is an excellent way to extend the life of your food, reduce waste, and even create unique flavors and textures that can elevate your cooking. It's also a great way to enjoy your favorite seasonal foods all year round and can save you money in the long run.
The best preservation method depends on your specific needs and the type of food you're preserving. Remember - it is crucial to prioritize food safety throughout the entire process. Neglecting proper food safety measures when preserving your own foods at home can lead to serious health risks and foodborne illnesses.
To ensure the safety of your preserved foods, follow recommended guidelines and best practices, and adhere to appropriate processing techniques, such as using the correct pressure canner for low-acid foods or employing a water bath canner for high-acid foods. Follow tested and approved recipes from reputable sources to maintain the right balance of acidity, heat, and processing time.
Lastly, remember that food preservation is an ongoing learning process. Stay informed and updated on the latest food safety guidelines and techniques. The following resources are excellent references for comprehensive food safety information:
Food preservation is an excellent way to extend the life of your food, reduce waste, and even create unique flavors and textures that can elevate your cooking. It's also a great way to enjoy your favorite seasonal foods all year round and can save you money in the long run.
The best preservation method depends on your specific needs and the type of food you're preserving. Remember - it is crucial to prioritize food safety throughout the entire process. Neglecting proper food safety measures when preserving your own foods at home can lead to serious health risks and foodborne illnesses.
To ensure the safety of your preserved foods, follow recommended guidelines and best practices, and adhere to appropriate processing techniques, such as using the correct pressure canner for low-acid foods or employing a water bath canner for high-acid foods. Follow tested and approved recipes from reputable sources to maintain the right balance of acidity, heat, and processing time.
Lastly, remember that food preservation is an ongoing learning process. Stay informed and updated on the latest food safety guidelines and techniques. The following resources are excellent references for comprehensive food safety information:
- The United States Department of Agriculture (USDA): Visit their website at www.usda.gov or call the USDA Meat and Poultry Hotline at 1-888-674-6854 for specific inquiries.
- The National Center for Home Food Preservation (NCHFP): Explore their website at www.nchfp.uga.edu for reliable information and tested recipes for canning, freezing, and other food preservation methods.
- The Centers for Disease Control and Prevention (CDC): Access their website at www.cdc.gov for up-to-date guidelines on food safety, including information on foodborne illnesses and prevention measures.
Orders
Services
About
Your Pasco Wilco Store

Store Hours
Monday - Saturday 7am - 8pm, Sunday 9am - 6pm

Need Help?
For questions or help with online orders call: (888) 78-WILCO
Limited to stock on hand. Some items may vary from photos. Because of store size limitations or geography, some items featured may not be available in all stores but will be made available by special order during sale periods at advertised prices. All sale prices listed as “dollars off” or “% off” are discounted from our regular posted shelf price, not from discounts given with specialty, bulk or pallet pricing. Reseller and Drop-shippers must contact us for pre-approval to place orders with the intent to re-distribute.
© 2026, Wilco Farm Store