Shopping at McMinnville - Monday - Saturday 7am - 8pm, Sunday 9am - 6pm
McMinnvilleMonday - Saturday 7am - 8pm, Sunday 9am - 6pm

Herbal Harvest: The Ultimate Guide to Growing and Drying Herbs at Home
March 3, 2023
Gardening & Plants
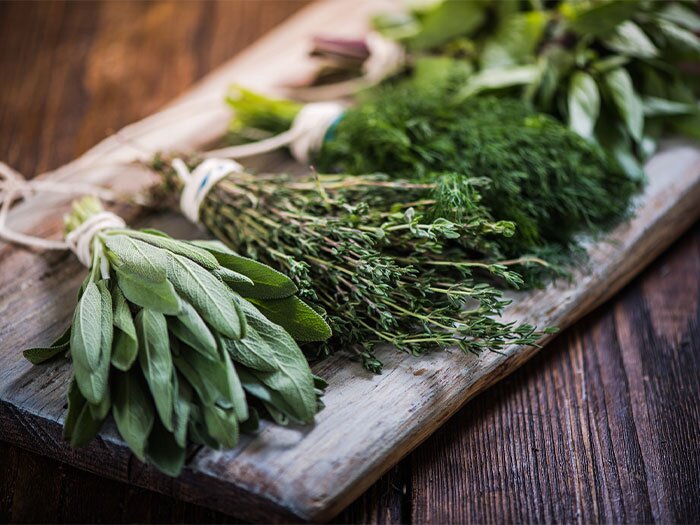
 Herbs have been a staple in human culture for thousands of years, used for both their flavorful and medicinal properties. Whether you're a seasoned gardener or just starting out, growing and drying your own herbs is a simple and rewarding way to bring a touch of nature into your home.
With their vibrant colors, intoxicating scents, and versatile uses, herbs are the perfect addition to any kitchen, medicine cabinet, or spa-like retreat.
Here, we'll delve into the world of herbs, exploring the different types you can grow, the steps involved in setting up an herb garden, and the best techniques for harvesting and drying your bounty.
Herbs have been a staple in human culture for thousands of years, used for both their flavorful and medicinal properties. Whether you're a seasoned gardener or just starting out, growing and drying your own herbs is a simple and rewarding way to bring a touch of nature into your home.
With their vibrant colors, intoxicating scents, and versatile uses, herbs are the perfect addition to any kitchen, medicine cabinet, or spa-like retreat.
Here, we'll delve into the world of herbs, exploring the different types you can grow, the steps involved in setting up an herb garden, and the best techniques for harvesting and drying your bounty.
Benefits of Growing and Drying Herbs
Growing and drying herbs is a rewarding and enjoyable way to add fresh flavors and scents to your home cooking, and it also has numerous benefits beyond just the taste and aroma. Here are some of the top benefits of growing and drying herbs at home:Cost Effective
Growing your own herbs can save you money in the long run, as store-bought herbs can be expensive and often go bad before you have a chance to use them. With your own herb garden, you can simply harvest what you need, when you need it, and let the rest keep growing.Organic and Natural
When you grow your own herbs, you have complete control over the growing conditions, meaning you can avoid the use of harmful pesticides and chemicals. Plus, you know exactly what goes into your herbs, so you can be sure they are fresh and natural.Sustainable
Growing your own herbs is an eco-friendly way to reduce your carbon footprint. You can reduce the amount of plastic packaging, processing, and transportation required to bring fresh herbs to your kitchen.Health Benefits
Many herbs have medicinal properties, and using fresh or dried herbs in your cooking can provide numerous health benefits. For example, herbs like mint and chamomile can help with digestion and relaxation, while others like basil and oregano contain antioxidants and anti-inflammatory properties.Flavorful
Fresh herbs have a much stronger and more complex flavor than commercially-produced dried herbs, which can be a game-changer in your home cooking or when making drinks. Drying your own herbs is an easy and convenient way to capture that fresh flavor and keep it on hand all year round.Types of Herbs to Grow and Dry

Common Herbs Used in Cooking
When it comes to cooking, herbs are a versatile and essential ingredient in many dishes. Here are some of the most common leafy herbs used in the kitchen:- Basil: This sweet and fragrant herb is a staple in Italian cooking and is often used in dishes like pesto, pasta sauces, and salads.
- Thyme: Thyme is a versatile herb that works well in many dishes, from roasted meats to soups and stews. Its slightly pungent flavor pairs well with lemon, garlic, and rosemary.
- Sage: Sage has a slightly earthy and piney flavor that is perfect for seasoning poultry, sausage, and stuffing.
- Rosemary: This herb has a robust and slightly piney and lemony flavor that works well with grilled meats and roasted vegetables.
- Oregano: Oregano is a staple in Mediterranean and Mexican cooking, used in dishes like pizza, tacos, and marinades.
- Parsley: This mild herb is a classic garnish, but it also adds a pop of color and flavor to salads, soups, and sauces.
- Chives: With their mild onion flavor, chives are a popular garnish for baked potatoes and soups.
Medicinal Herbs
Herbs have been used for medicinal purposes for thousands of years and continue to play an important role in modern alternative medicine. Here are a few medicinal herbs that you can grow and dry at home:- Echinacea: This herb is commonly used to boost the immune system and prevent colds and flu. It can be consumed as a tea, tincture, or capsule.
- Ginger: Ginger has anti-inflammatory and antioxidant properties and is commonly used to treat nausea, digestive issues, and pain.
- Peppermint: Peppermint has a cooling effect and is often used to soothe digestive issues, headaches, and sore muscles. It can be consumed as a tea or applied topically as an essential oil.
- Lavender: Lavender is known for its calming and relaxing properties and is often used in aromatherapy to promote sleep and reduce stress.
- Turmeric: This vibrant yellow root has powerful anti-inflammatory and antioxidant properties and is commonly used to treat a variety of health issues, from joint pain to heart disease.
Herbs for Aromatherapy
Aromatherapy is the practice of using essential oils and scents to promote physical and emotional well-being. Many herbs have a natural fragrance that can be used in aromatherapy, either as essential oils or dried herbs. Here are a few herbs commonly used for their aromatic properties:- Lavender: This fragrant herb is known for its calming and relaxing properties, making it a popular choice for aromatherapy. You can use dried lavender in sachets, burn it as incense, or diffuse lavender essential oil.
- Rose: The delicate fragrance of roses has long been associated with love and beauty. Rose petals or rose essential oil can be used in diffusers, added to bath water, or made into potpourri.
- Peppermint: Peppermint has a fresh and invigorating scent that can help to clear the mind and promote energy. Peppermint essential oil can be used in diffusers or applied topically.
- Eucalyptus: Eucalyptus has a fresh and medicinal scent that is often used to clear congestion and boost the immune system. Eucalyptus essential oil can be used in diffusers or added to bath water.
- Sage: Sage has a woody and slightly earthy scent that is associated with purification and protection. Dried sage can be burned as smudge sticks, or sage essential oil can be used in diffusers.
Setting Up an Herb Garden

Choosing a Location
When it comes to growing fresh garden herbs, choosing the right location is key to their success. Here are a few things to consider when selecting a spot for your herb garden:- Light: Most herbs prefer full sun, meaning they need at least six hours of direct sunlight each day. However, some herbs, like mint, can tolerate partial shade. Make sure to research the light requirements of the specific herbs you want to grow.
- Soil: Herbs generally prefer well-draining soil that is rich in organic matter. If your soil is heavy or poorly draining, consider raised beds or containers for growing herbs with a shallow root system.
- Space: Depending on the size of the herbs you're growing, you'll need to make sure you have enough room for them to spread out. Some herbs, like basil, can be quite large, while others, like chives, can be planted in closer proximity.
- Accessibility: Choose a location that is easy to access so you can water and harvest your herbs regularly. You may also want to consider proximity to your kitchen, so you can quickly snip a few sprigs of herbs while you're cooking.
Soil Preparation
Preparing the soil is an important step in ensuring the success of your herb garden. Here are some tips for preparing the soil for your herbs:- Test the soil: A soil test will tell you the pH of your soil and the levels of essential nutrients. Most herbs prefer a slightly acidic soil with a pH of 6.0 to 7.0, but it's important to check the specific requirements of the herbs you're growing.
- Improve soil quality: If your soil is heavy or poorly draining, consider adding compost or other organic matter to improve its quality. You can also amend the soil with coarse sand or perlite to increase drainage.
- Prepare raised beds or containers: If your soil is not ideal for growing herbs, consider planting them in raised beds or containers. Fill the beds or containers with a high-quality potting soil designed for herbs.
- Fertilize: Herbs generally do not require heavy fertilization, but a slow-release organic fertilizer can be added at planting time to give them a boost. Make sure to follow the instructions on the fertilizer package.
Selecting the Right Containers
If you don't have a suitable outdoor space for a herb garden, or if you want to grow herbs indoors, containers are a great option. Here are some tips for selecting the right containers for your herbs:- Size: The container you choose should be large enough to accommodate the roots of the herb you're growing. As a general rule, a container should be at least 8 inches deep and wide for small herbs, and 12 to 16 inches for larger or multiple herbs.
- Drainage: Containers should have adequate drainage holes to prevent water from standing in the soil, which can lead to root rot. If your container does not have drainage holes, you can drill holes yourself.
- Material: Containers can be made of a variety of materials, including plastic, terra cotta, metal, or wood. Terra cotta is a popular choice because it allows the soil to dry out between waterings, but plastic containers are lighter and easier to move around.
- Style: Container gardening offers a lot of creative opportunities, so don't be afraid to choose containers that reflect your personal style. You can mix and match different materials, shapes, and colors to create a unique and attractive herb garden.
Planting and Care Instructions
Once you've prepared the soil and chosen the right containers, it's time to plant your herbs. Here are some tips for planting and caring for your herbs:- Timing: The best time to plant herbs outside is early spring, after the last frost date in your area, or indoors all year round. However, the timing can depend on whether you have annual, biennial, or perennial herbs, as well as your local climate and weather.
- Space: Leave enough space between herbs to allow for proper air circulation and growth. As a general rule, small herbs should be planted about 6 inches apart, while larger herbs may need up to 18-24 inches of space.
- Watering: Herbs should be watered regularly, but be careful not to overwater, as this can lead to root rot. Water the herbs until the soil is evenly moist, but not waterlogged.
- Pruning: Pruning your herbs regularly will encourage bushier growth and promote the production of more leaves and flowers. Cut back the herbs to about half their height when they begin to look leggy or overgrown.
- Fertilizing: Most herbs do not need heavy fertilization, but a slow-release organic fertilizer can be added at planting time. Herbs vary in their fertilizer needs.
Harvesting and Drying Herbs

Timing of Harvest
Harvesting herbs at the right time is essential for maximum flavor and aroma. Here are some tips for timing your herb harvests:- Harvest leaves regularly: Herbs can be harvested regularly throughout the growing season by snipping off the tips of the stems. This will encourage bushier growth and prevent the herbs from flowering and going to seed.
- Harvest leaves before flowering: For the best flavor, harvest herbs before they begin to flower. Once the herbs begin to produce flowers, the flavor of the leaves can become bitter or strong.
- Harvest in the morning: The best time to harvest herbs is in the morning, after the dew has dried but before the heat of the day. This is when the oils in the herbs are at their peak and the herbs are at their most flavorful.
Methods of Harvesting
There are several methods for harvesting herbs, depending on the type of herb and how you plan to use it. Here are some common methods for harvesting herbs:- Snipping: The most common method of harvesting herbs is simply snipping off the tips of the stems with scissors or pruning shears. This is a quick and easy way to harvest herbs for cooking or aromatherapy.
- Pinching: Pinching back the tips of the stems is a method of harvesting herbs that encourages bushier growth. Pinching back the stems regularly will keep the herbs from getting too leggy and will promote the production of more leaves and flowers.
- Cutting: For drying herbs, you may want to harvest the entire plant or a large portion of it. To do this, cut the stem about 4 inches from the base of the plant and hang the stems upside down in a cool, dry place to dry.
- Stripping: For some herbs, like rosemary and thyme, you may want to strip the leaves from the stems before drying. To do this, simply hold the stem in one hand and use the other hand to strip the leaves from the stem.
Drying Techniques
Drying herbs is a simple and effective way to preserve herbs’ flavor and aroma for later use. Here are some common techniques to dry your own herbs:- Air-drying: Air-drying is the simplest and most traditional method of drying herbs. To let herbs dry, simply hang the stems upside down in a cool, dry place, away from direct sunlight. Leave the herbs to dry for about two weeks or until the leaves are completely dry and crumbly.
- Dehydrator: A dehydrator is a machine that uses heat and air circulation to dry herbs quickly and evenly. To dry herbs in a dehydrator, simply place the herbs on the dehydrator trays and turn on the machine. Dehydrating herbs usually takes anywhere from 4 to 12 hours, depending on the type of herb and the setting on the dehydrator.
- Microwave: The microwave is a quick and convenient way to dry herbs, but with this drying process it can be easy to over-dry or burn the herbs if you're not careful. To dry herbs in the microwave, place the herbs on a plate and microwave on high for 1 to 2 minutes. Check the herbs every 30 seconds and remove them from the microwave as soon as they are dry.
- Oven: Oven-drying is another option for drying herbs, but it is not as effective as air-drying or using a dehydrator. To dry herbs in the oven, place the herbs on a baking sheet and bake in a low oven (about 180° F) for about an hour or until the leaves are completely dry and crumbly. You can leave the oven door open during the process.
Storing Dried Herbs
Once your herbs are dried, it's important to store herbs properly to preserve their flavor and aroma for as long as possible. Here are some tips for storing dry fresh herbs:- Airtight containers: Keep your herbs fresh for longer by storing them in airtight containers, such as glass jars or plastic bags with zippers. This will help keep out moisture and light, which can cause the herbs to lose their flavor and aroma over time.
- Label your containers: Label your containers with the name of the herb and the date of harvest. This will help you keep track of which herbs you have and how long they have been stored.
- Keep herbs away from light and heat: Store dried herbs in a cool, dark place, away from direct sunlight and heat sources. This will help prevent the herbs from losing their flavor and aroma over time.
- Use them within a year: Dried herbs will last for up to a year if stored properly, but they are at their best when used within the first 6 months. After a year, the herbs will start to lose their flavor and aroma, so be sure to use them up or replace them with fresh herbs.
Using Dried Herbs

Cooking with Dried Herbs
Dried herbs are a convenient and flavorful addition to many recipes, offering a quick and easy way to add depth and complexity to your cooking. Here are some tips for cooking with dried herbs:- Rehydrate before cooking: If a recipe calls for fresh herbs, it's best to rehydrate the dried herbs before using them. To rehydrate dried herbs, simply soak them in warm water for about 10 minutes or until they are soft and pliable.
- Use less dried herbs than fresh: Dried herbs are more concentrated in flavor than fresh herbs, so you'll need to use less of them in your cooking. As a general rule, use about one-third of the amount of dried herbs as you would fresh herbs.
- Add them early in cooking: To maximize the flavor of dried herbs, it's best to add them early in the cooking process, allowing the herbs to release their essential oils and aromas. For example, dried basil can be added to tomato sauce at the beginning of cooking, while dried rosemary can be added to a roast chicken before roasting.
- Crush before cooking: Crushing dried herbs before adding them to a recipe can help to release their flavor and aroma. Simply crush the dried herbs between your fingers or use a mortar and pestle to grind them into a fine powder.
Making Herbal Teas
Herbal teas are a delicious and healthy way to enjoy the benefits of herbs, offering a simple and soothing way to relax and unwind. Here are some tips for making herbal teas:- Choose your herbs: Herbal teas can be made from a variety of herbs, such as chamomile, mint, lemon balm, and rose hips, to name a few. Choose an herb that you enjoy the flavor of and that will help to meet your specific needs, whether it be for relaxation, digestion, or immune support.
- Use fresh or dried herbs: Herbal teas can be made with either fresh or dried herbs. If using fresh herbs, be sure to wash them thoroughly and chop them finely before using. If using dried herbs, be sure to crush them between your fingers or grind them into a fine powder to release their full flavor and aroma.
- Prepare the water: Herbal teas are best made with freshly boiled water that has cooled for about a minute. This will help to release the full flavor and aroma of the herbs and prevent the water from being too hot and damaging the delicate flavors of the herbs.
- Steep the herbs: Once the water is ready, simply add the herbs to the water and steep for about 5-10 minutes, depending on the type of herb and the strength of the tea you prefer. Be sure to strain the tea before drinking to remove any leaves or stems.
- Sweeten if desired: Some herbal teas may be bitter, so feel free to sweeten the tea with honey or a natural sweetener of your choice.
Start Your Herb Garden Today with Wilco Farm Stores
Growing and drying herbs is a rewarding and fulfilling experience that can bring a wealth of benefits to your health and well-being. Whether you're interested in cooking with herbs, using them for aromatherapy, or taking advantage of their medicinal properties, there's a world of possibilities waiting for you. Wilco Farm Stores is an excellent place to begin your journey. With a wide selection of high-quality soil, containers, and other gardening supplies, Wilco has everything you need to get started. Plus, their knowledgeable staff is always on hand to answer any questions you may have and help guide you on your journey.Orders
Services
About
Your McMinnville Wilco Store

Store Hours
Monday - Saturday 7am - 8pm, Sunday 9am - 6pm

Need Help?
For questions or help with online orders call: (888) 78-WILCO
Limited to stock on hand. Some items may vary from photos. Because of store size limitations or geography, some items featured may not be available in all stores but will be made available by special order during sale periods at advertised prices. All sale prices listed as “dollars off” or “% off” are discounted from our regular posted shelf price, not from discounts given with specialty, bulk or pallet pricing. Reseller and Drop-shippers must contact us for pre-approval to place orders with the intent to re-distribute.
© 2026, Wilco Farm Store