
 Step 1: Paint Preparation: Prepare the Work Area
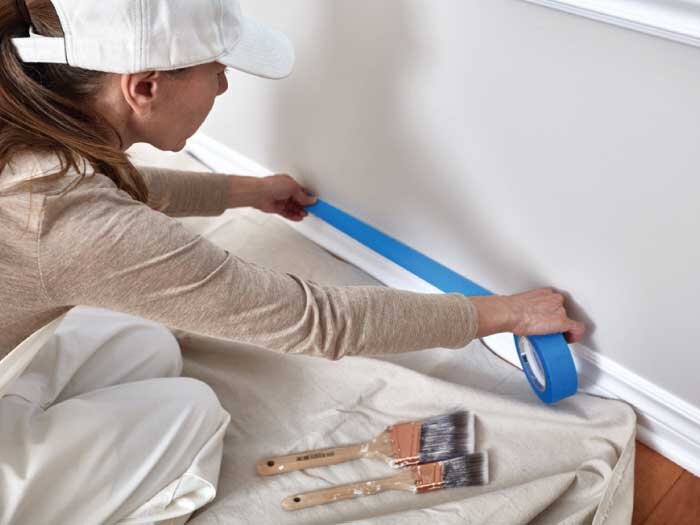
If your painting project takes place indoors, remove furniture from the room in which you're working or place it in the center of the room and cover it with drop cloths. Place drop cloths or tarps on the floor and remove fixtures, window coverings, switch plates and outlet covers. Use painter's tape to protect windowsills, baseboards, door hinges, the ceiling perimeter and anything else that you don't want to get paint on.
For outside projects, use drop cloths to cover cars, patio furniture, shrubs and anything else you don't want splattered. Although you're painting outside, it's a good idea to cover the ground so you don't get paint on walkways, driveways, or in your yard. Remove all screens, light fixtures, plumbing outlets, electrical covers, shutters and address numbers/placards or cover them with painter's tape before you begin painting.
Step 2: Clean and Repair Surfaces
Properly cleaning and repairing surfaces is extremely important when painting since paint doesn't adhere to dirt or damaged areas. When working inside, use a sponge or cloth to wipe down your interior walls with mild detergent and water and allow it to dry. If walls have cracks, holes or have areas that are damaged, apply spackling compound with a putty knife. Once it dries, sand it with fine-grit sandpaper. For extensive drywall damage, see this project on patching drywall holes to learn how to make larger repairs.
Helpful Tip
If you need to make repairs, add an extra day to your plans to give the compound time to dry.
When working outside, remove peeling or flaking paint by sanding and scraping it off. Scrape first using a large scraper, then rent or buy a disc sander. Begin sanding with a coarse abrasive and then finish with a fine one. It's particularly important to smooth the edges between the painted and scraped areas because painting will accentuate any ridges and edges left behind.
Safety Alerts!
If your home was built before 1978, test the exterior layer of paint with a lead paint testing kit to determine whether it contains any lead-based paint. Lead poses a serious health hazard, especially to children and pregnant women. To protect yourself and your family, avoid scraping or sanding lead-based paint.
When using a ladder to reach high areas, invest in an adjustable ladder stabilizer that attaches to the ladder and braces onto the roof.
Remove any dirt and eliminate mildew by washing surfaces with a mixture of water, trisodium phosphate (TSP) and bleach with a long-handled brush. Then thoroughly spray surfaces with a pressure washer loaded with a mild detergent. Let everything dry completely before you start painting. When cleaning stucco homes, or if the surface is chalky or crumbly after cleaning, also apply a masonry surface conditioner.
Safety Alert!
Use TSP as directed by the manufacturer. TSP can corrode metal and damage finished wood. Be sure to wear protective goggles, clothing and rubber gloves.
Use an exterior spackling compound to repair any holes or damaged areas. With wood, it's also important to caulk joints and cracks in areas such as trim and window frames using paintable caulk. Use an old screwdriver to scrape out any old caulk and clean the joint using a small brush. Apply paintable caulk with a caulking tool.
Step 1: Paint Preparation: Prepare the Work Area
If your painting project takes place indoors, remove furniture from the room in which you're working or place it in the center of the room and cover it with drop cloths. Place drop cloths or tarps on the floor and remove fixtures, window coverings, switch plates and outlet covers. Use painter's tape to protect windowsills, baseboards, door hinges, the ceiling perimeter and anything else that you don't want to get paint on.
For outside projects, use drop cloths to cover cars, patio furniture, shrubs and anything else you don't want splattered. Although you're painting outside, it's a good idea to cover the ground so you don't get paint on walkways, driveways, or in your yard. Remove all screens, light fixtures, plumbing outlets, electrical covers, shutters and address numbers/placards or cover them with painter's tape before you begin painting.
Step 2: Clean and Repair Surfaces
Properly cleaning and repairing surfaces is extremely important when painting since paint doesn't adhere to dirt or damaged areas. When working inside, use a sponge or cloth to wipe down your interior walls with mild detergent and water and allow it to dry. If walls have cracks, holes or have areas that are damaged, apply spackling compound with a putty knife. Once it dries, sand it with fine-grit sandpaper. For extensive drywall damage, see this project on patching drywall holes to learn how to make larger repairs.
Helpful Tip
If you need to make repairs, add an extra day to your plans to give the compound time to dry.
When working outside, remove peeling or flaking paint by sanding and scraping it off. Scrape first using a large scraper, then rent or buy a disc sander. Begin sanding with a coarse abrasive and then finish with a fine one. It's particularly important to smooth the edges between the painted and scraped areas because painting will accentuate any ridges and edges left behind.
Safety Alerts!
If your home was built before 1978, test the exterior layer of paint with a lead paint testing kit to determine whether it contains any lead-based paint. Lead poses a serious health hazard, especially to children and pregnant women. To protect yourself and your family, avoid scraping or sanding lead-based paint.
When using a ladder to reach high areas, invest in an adjustable ladder stabilizer that attaches to the ladder and braces onto the roof.
Remove any dirt and eliminate mildew by washing surfaces with a mixture of water, trisodium phosphate (TSP) and bleach with a long-handled brush. Then thoroughly spray surfaces with a pressure washer loaded with a mild detergent. Let everything dry completely before you start painting. When cleaning stucco homes, or if the surface is chalky or crumbly after cleaning, also apply a masonry surface conditioner.
Safety Alert!
Use TSP as directed by the manufacturer. TSP can corrode metal and damage finished wood. Be sure to wear protective goggles, clothing and rubber gloves.
Use an exterior spackling compound to repair any holes or damaged areas. With wood, it's also important to caulk joints and cracks in areas such as trim and window frames using paintable caulk. Use an old screwdriver to scrape out any old caulk and clean the joint using a small brush. Apply paintable caulk with a caulking tool.
 Step 3: Choose the Right Primer and Paint
On interior surfaces, use EasyCare Ultra Premium Interior Paint. It comes in a wide array of colors and finishes, including durable flat, flat enamel, eggshell, satin, semi-gloss and high-gloss. Your Local Paint Design Center Experts can answer questions you have about paint and paint color. While you're there, you can pick up a Custom Mixed Color Sample to try a few colors on your walls at home. Color samples allow you to paint a small space and live with different options for a while before making your decision. You can also pick up Paint Idea Cards for the latest colors; or Stripe Cards, which show shades of the same color.
When painting the exterior of your home, the outside surface will determine what kind of paint and primer to use. It is recommended that you use latex paints, which have higher durability on exterior surfaces than oil-based paints. Latex paint provides better fade resistance, flexibility, chalk resistance and adhesion. If your home is older, it may already have many layers of oil-based paint on its surface. If this is the case, use oil-based paint as your base coat, and then apply exterior latex paint over it.
When painting aluminum or vinyl siding, use an exterior latex primer such as True Value EasyCare® Ultra Premium Exterior Primer/Sealer and paint such as True Value EasyCare® Ultra Premium Exterior Paint in Satin Finish. If you will be painting masonry, such as brick, concrete or stucco, paint with True Value EasyCare® Ultra Premium Exterior Masonry/Stucco Paint. If you have wood siding on your home, use True Value EasyCare® Ultra Premium Exterior Paint in your desired sheen.
Flat and satin sheens are good for exterior siding because they have little reflection. Semi-gloss sheens are easier to clean resist mildew and chalking and are typically used for shutters and trim. Vinyl or aluminum siding that is slightly dented or worn looks best when repainted with a flat sheen because it helps to camouflage imperfections. A satin finish is a better choice when the siding is in good condition.
Once you've decided what colors you are going to use, you'll need to know how much to buy. When estimating, a good rule of thumb is to multiply the length of each surface by its height and add another 30 percent for good measure. Typically, one gallon of paint will cover 350 to 400 square feet. Buy more than you think you need; you can always use the extra for touch-ups. EasyCare Ultra Premium Exterior Paint is available in both latex and oil-based formulas.
Step 4: Prime
When painting your home's interior, you don't have to apply a coat of primer before you paint, but doing so will make the paint adhere and wear better. Additionally, priming is advisable if your walls or ceilings are stained or you wish to use light-colored paint over dark walls. Apply True Value EasyCare® Ultra Premium Interior Primer/Sealer with a brush or roller and paint widthwise in 6' sections, using a zigzag pattern of overlapping "W" strokes. Move from right to left, then left to right, spreading evenly with vertical strokes. Let it dry thoroughly.
Safety Alert!
Open the windows to make sure you'll be priming and painting in a well-ventilated area.
Step 5: Paint
Apply EasyCare Ultra Premium Interior Paint using the same technique you used for priming. If necessary, apply a second coat. You don't have to let the paint completely dry between coats, but the longer you wait the better your results will be.
Step 6: Paint Cleanup
Pick up your drop cloths or tarps and close up your paint cans. Dispose of used paint or sealant cans appropriately. Cleaning paint brushes and other tools can be made easy with warm water and soapy water. Thoroughly rinse your roller covers and brushes in water (if you used latex paint) or paint thinner (for oil-based paint) until the solvent runs clear, then place them in a brush/roller spinner, if you have one, to remove excess liquid. Store in their protective sleeves or hang them on nails or hooks. Pick up drop cloths carefully, making sure you don't spread around any paint that may have gotten on them. Next, remove painter's tape at a 45-degree angle to avoid removing any fresh paint. Remember that the longer it stays on, the harder it is to remove.
That's it! You now have the know-how to transform your home with paint and wrap up the job with minimal fuss.
Step 3: Choose the Right Primer and Paint
On interior surfaces, use EasyCare Ultra Premium Interior Paint. It comes in a wide array of colors and finishes, including durable flat, flat enamel, eggshell, satin, semi-gloss and high-gloss. Your Local Paint Design Center Experts can answer questions you have about paint and paint color. While you're there, you can pick up a Custom Mixed Color Sample to try a few colors on your walls at home. Color samples allow you to paint a small space and live with different options for a while before making your decision. You can also pick up Paint Idea Cards for the latest colors; or Stripe Cards, which show shades of the same color.
When painting the exterior of your home, the outside surface will determine what kind of paint and primer to use. It is recommended that you use latex paints, which have higher durability on exterior surfaces than oil-based paints. Latex paint provides better fade resistance, flexibility, chalk resistance and adhesion. If your home is older, it may already have many layers of oil-based paint on its surface. If this is the case, use oil-based paint as your base coat, and then apply exterior latex paint over it.
When painting aluminum or vinyl siding, use an exterior latex primer such as True Value EasyCare® Ultra Premium Exterior Primer/Sealer and paint such as True Value EasyCare® Ultra Premium Exterior Paint in Satin Finish. If you will be painting masonry, such as brick, concrete or stucco, paint with True Value EasyCare® Ultra Premium Exterior Masonry/Stucco Paint. If you have wood siding on your home, use True Value EasyCare® Ultra Premium Exterior Paint in your desired sheen.
Flat and satin sheens are good for exterior siding because they have little reflection. Semi-gloss sheens are easier to clean resist mildew and chalking and are typically used for shutters and trim. Vinyl or aluminum siding that is slightly dented or worn looks best when repainted with a flat sheen because it helps to camouflage imperfections. A satin finish is a better choice when the siding is in good condition.
Once you've decided what colors you are going to use, you'll need to know how much to buy. When estimating, a good rule of thumb is to multiply the length of each surface by its height and add another 30 percent for good measure. Typically, one gallon of paint will cover 350 to 400 square feet. Buy more than you think you need; you can always use the extra for touch-ups. EasyCare Ultra Premium Exterior Paint is available in both latex and oil-based formulas.
Step 4: Prime
When painting your home's interior, you don't have to apply a coat of primer before you paint, but doing so will make the paint adhere and wear better. Additionally, priming is advisable if your walls or ceilings are stained or you wish to use light-colored paint over dark walls. Apply True Value EasyCare® Ultra Premium Interior Primer/Sealer with a brush or roller and paint widthwise in 6' sections, using a zigzag pattern of overlapping "W" strokes. Move from right to left, then left to right, spreading evenly with vertical strokes. Let it dry thoroughly.
Safety Alert!
Open the windows to make sure you'll be priming and painting in a well-ventilated area.
Step 5: Paint
Apply EasyCare Ultra Premium Interior Paint using the same technique you used for priming. If necessary, apply a second coat. You don't have to let the paint completely dry between coats, but the longer you wait the better your results will be.
Step 6: Paint Cleanup
Pick up your drop cloths or tarps and close up your paint cans. Dispose of used paint or sealant cans appropriately. Cleaning paint brushes and other tools can be made easy with warm water and soapy water. Thoroughly rinse your roller covers and brushes in water (if you used latex paint) or paint thinner (for oil-based paint) until the solvent runs clear, then place them in a brush/roller spinner, if you have one, to remove excess liquid. Store in their protective sleeves or hang them on nails or hooks. Pick up drop cloths carefully, making sure you don't spread around any paint that may have gotten on them. Next, remove painter's tape at a 45-degree angle to avoid removing any fresh paint. Remember that the longer it stays on, the harder it is to remove.
That's it! You now have the know-how to transform your home with paint and wrap up the job with minimal fuss.Orders
Services
About
Your Wilco Store

Store Hours
Monday - Saturday 7am - 8pm, Sunday 9am - 6pm

Need Help?
For questions or help with online orders call: (888) 78-WILCO
Limited to stock on hand. Some items may vary from photos. Because of store size limitations or geography, some items featured may not be available in all stores but will be made available by special order during sale periods at advertised prices. All sale prices listed as “dollars off” or “% off” are discounted from our regular posted shelf price, not from discounts given with specialty, bulk or pallet pricing. Reseller and Drop-shippers must contact us for pre-approval to place orders with the intent to re-distribute.
© 2026, Wilco Farm Store