
It’s a little early to set out your tomato cages. Spring is still warming up and tomatoes can be so fussy when it comes to cold. But there’s another reason to pull out your structural supports. I’m going to show you two ways to create unique and easy plant stands and bird bathes with a couple tomato cages, some bolt cutters, a ball of twine, a pot or two, and a saucer.


Making a DIY Bird Bath out of Tomato Cages
When I started this project, all of the online pictures showed a cute stand with a terracotta or light glazed saucer for the top. Now, this is a great idea and when you’re shopping, it’s easy to find a variety of saucers. But for me…well, I just wasn’t inspired. So I headed to the local thrift store and sorted through all the platters until I found one I liked. My treasure actually had an added bonus - it was a chip and dip platter. Just for fun, I decided to use the center for a small succulent.
MATERIALS:
- 1 Tomato cage
STEPS:
1. Check the width of your platter. You need to have some overlap to keep the bird bath from dropping through the rings. 2. Decide how short or tall you want your bird bath to be. Remember, you will be using the bottom stakes in the ground like a traditional cage, so you’ll lose that height. I decided to go down just one section. I found it to be a little more stable than leaving it the original height. 3. Use bolt cutters to carefully cut the top section off at the junction of the next lowering. Careful. The bare metal can be sharp.
 4. Tie a knot in the jute around the first loop at the junction where you just cut. Begin looping the jute around and around and around and around. This takes some time, so sit back in the sun and turn on some tunes. I made knots every time I reached a new junction. Just in case the jute broke, it wouldn’t all unravel.
 5. Place the tomato cage where you’d like. I put mine in the center of my raised bed garden, hoping to lure butterflies and bees with my cool drink of water. Push the base as far into the ground as you can. I went all the way to the first loop just to get it as stable as possible.
6. Set the saucer on top. Now here’s where I had to do some on-the-fly maneuvering. My platter kept sliding from side to side so I had to figure out how to secure it to the base. I ended up tying rubber bands to the top ring, stretching them over the lip of the platter, and connecting them across with thin, green gardening wire. You could easily use a little jute instead. I figure this gives the birds a second perch. And it doesn’t really show from a distance.
5. Place the tomato cage where you’d like. I put mine in the center of my raised bed garden, hoping to lure butterflies and bees with my cool drink of water. Push the base as far into the ground as you can. I went all the way to the first loop just to get it as stable as possible.
6. Set the saucer on top. Now here’s where I had to do some on-the-fly maneuvering. My platter kept sliding from side to side so I had to figure out how to secure it to the base. I ended up tying rubber bands to the top ring, stretching them over the lip of the platter, and connecting them across with thin, green gardening wire. You could easily use a little jute instead. I figure this gives the birds a second perch. And it doesn’t really show from a distance.
 7. Planting the platter. My chips and dips platter had its own built-in pot. I planted it with a succulent, burying the wire. But, if you choose a flat saucer, you could still buy a separate little pot and fill it with something cute for the middle.
Making a DIY Plant Stand out of Tomato Cages
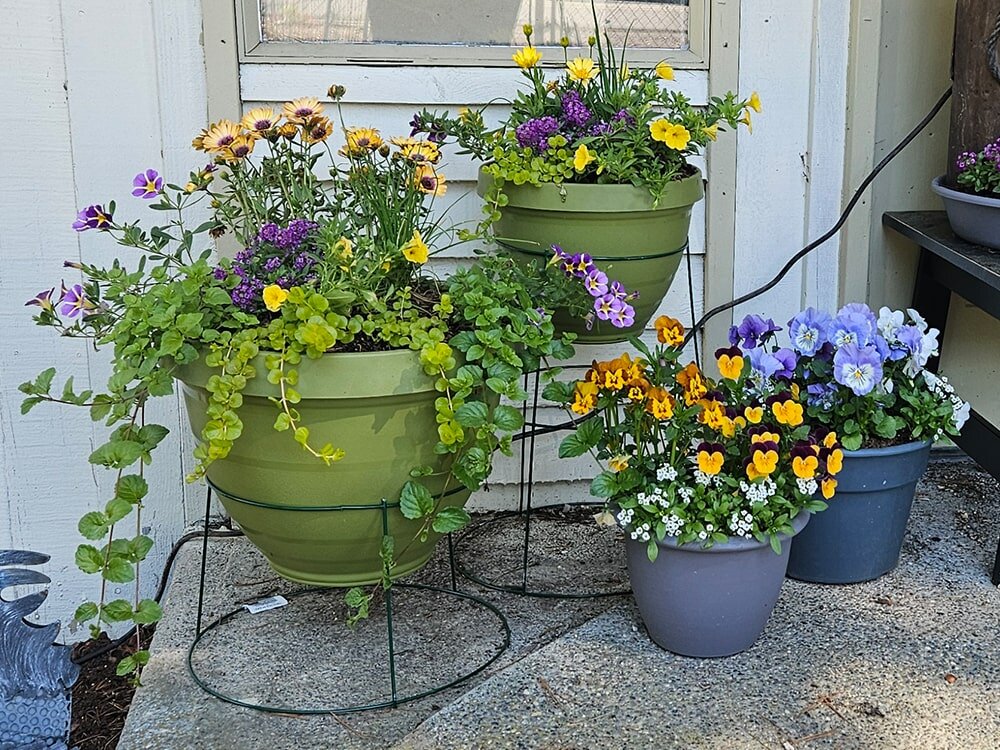
Now this one is a nifty trick. It’s easy and makes for a nice display. In the garden center, you always see potted plants at different heights in displays, filling in the empty spots. With a couple of tomato cage planter stands, you can recreate this look at home. Most of the materials are the same as the bird bath. The big difference is the pots versus the saucer, but even there you could use saucers if you like to create a multi-level bird bath frenzy.MATERIALS:
- 2-3 Tomato cages

STEPS:
1. Measure the width of the loop you want as the top level. Remember, we’re going to use the tomato cages upside down this time (although I suppose you could do them right side up and shove the bottoms into the ground). Choose a pot that sits halfway into the loop. 2. Use bolt cutters to carefully cut the sections off until you have loops on either end. Be careful! The bare metal can be sharp. 3. As above, tie a knot in the jute around the first loop at the junction where you just cut. Begin looping the jute around and around and around and around. Flip the tape cassette over and listen to side B while you wrap these loops. Again, I made knots every time I reached a new junction just in case. But unlike the bird bath, this time I wrapped each of the remaining loops, just for looks. 4. Repeat this with another tomato cage, but this time choose a different level and size of loop. Match it to a pot that fits nicely and then cut the cage to size. Wrap jute around the loops (or don’t…you may be done with the music by now). 5. When you set up your display, play around with having a taller one in the back, a medium one to one side, and pot on the ground. Or make it more symmetrical with a tall one and two mediums. Remember, mix and match the pots for a truly unique style. Try a different type of pot - use a colander (talk about some serious drainage), a milking pail, or a basket. So there you are. Two cool ways to reinvent your tomato cages. And just by changing the style of saucer, pot, or wrapping, you can completely change the look. Think white-washed wash tubs and lace wrapping on old rusty tomato cages. Honestly, there are lots of other things you could do with them. I used an end section from one of my planters for a dog bowl stand that sticks out of the dirt so my puppy can’t tip it over. The whole colander idea got me thinking about some kind of multi-tiered rain garden. You could even make some cute little side tables to put your tape player on while you enjoy your newly decked out garden.We would love to see your planting projects, use #mywilcolife on Facebook, Twitter, or Instagram and tag Wilco Stores.
ROBYN ROGERS, THE AUTHOR OF THIS BLOG IS LOCATED ON THE KITSAP PENINSULA IN WASHINGTON AND HER ADVICE IS CONSISTENT WITH THE CLIMATE THERE.
Orders
Services
About
Your Wilco Store

Store Hours
Monday - Saturday 7am - 8pm, Sunday 9am - 6pm

Need Help?
For questions or help with online orders call: (888) 78-WILCO
Limited to stock on hand. Some items may vary from photos. Because of store size limitations or geography, some items featured may not be available in all stores but will be made available by special order during sale periods at advertised prices. All sale prices listed as “dollars off” or “% off” are discounted from our regular posted shelf price, not from discounts given with specialty, bulk or pallet pricing. Reseller and Drop-shippers must contact us for pre-approval to place orders with the intent to re-distribute.
© 2026, Wilco Farm Store