
Master Spray Painting Basics for a Smooth, Professional Finish
May 21, 2025
Blog
Hardware, Paint & Home
If you’ve ever looked at a rusty garden tool or a faded lawn chair and thought, “I should really do something about that,” spray paint might be exactly what you need.
Spray painting is a fast, easy way to get smooth, even coverage on almost any surface. Unlike brushing on paint, spray paint goes on as a fine mist. That means fewer brush marks, faster drying, and less effort on your part.
 If you’ve got a weathered gate or a faded toolbox, spray painting might be your new best friend. It’s a go-to method for freshening up:
For more about paint sprayers, read Using an Airless Paint Sprayer.
 Spray paint isn’t one-size-fits-all. Here's a quick guide to help you match the paint to the project.
Tip: Always read the label. It’ll tell you what the paint sticks to, how to prep the surface, and how long to wait between coats.
Spray paint isn’t one-size-fits-all. Here's a quick guide to help you match the paint to the project.
Tip: Always read the label. It’ll tell you what the paint sticks to, how to prep the surface, and how long to wait between coats.
 These steps will help you get started, whether freshening up a rusty gate or giving an old bench a new look.
Tip: Practice on a scrap board first to learn how to adjust your spray pattern and keep the can moving to avoid drips. Once you get the hang of it, spraying paint is kind of fun.
These steps will help you get started, whether freshening up a rusty gate or giving an old bench a new look.
Tip: Practice on a scrap board first to learn how to adjust your spray pattern and keep the can moving to avoid drips. Once you get the hang of it, spraying paint is kind of fun.
 Getting a clean, even finish with spray paint doesn’t require fancy tools – it just takes a few smart techniques.
Why Spray Paint?
If you’ve got a weathered gate or a faded toolbox, spray painting might be your new best friend. It’s a go-to method for freshening up:
- Fences and gates – Especially chain-link or metal ones that are tough to brush paint.
- Farm tools – Think shovels, hoes, and wheelbarrows. A quick coat can prevent rust and make old tools look new.
- Outdoor furniture – Metal or plastic chairs and tables will get a second life with the right paint.
- Equipment parts – Spray paint is handy for touching up trailers, tractors, and even small engine housings.
Spray Cans vs. Paint Sprayers
When it’s time to spray paint something, you’ve got two main options: spray cans or a paint sprayer. Both get the job done, but each shines in different situations. Let’s break it down so you know which tool to grab.- Spray cans are great for small projects and quick fixes. They come ready to go – no setup, no cleanup, and no compressor required.
- Paint sprayers (also called spray guns or paint guns) are your go-to tool for larger surfaces or repeat use. Once you know how to use a paint sprayer, you’ll never want to brush paint a fence again.
| Project Type | Spray Can | Paint Sprayer |
| Small tools or furniture | ✅ | 🚫 |
| Fences or gates | 🚫 | ✅ |
| Touch-up on worn paint | ✅ | 🚫 |
| Full repaint (shed, trailer) | 🚫 | ✅ |
| One-time DIY project | ✅ | 🚫 |
| Multiple large jobs per year | 🚫 | ✅ |
Can You Use Spray Paint in a Paint Sprayer?
Not usually. Most spray paints in aerosol cans aren't made to be poured into a paint sprayer. The formula is different, and the propellant (the stuff that pushes the paint out of the can) is built into the can – not something you can replicate in a sprayer. However, if you're wondering whether you can use the same type of paint available in spray cans in a paint sprayer, the answer is sometimes yes. But it depends on the product. Some paints are sold in both aerosol and liquid form, so check the label. If you're buying a quart or gallon of Rust-Oleum, it may be spray-gun friendly. Just keep in mind that you may need to thin it. Many paints need to be thinned before going into a sprayer so they don't clog the nozzle. And make sure to use the right tip. Thick paints need a larger spray tip to flow smoothly.Pick the Right Spray Paint for the Job
Spray paint isn’t one-size-fits-all. Here's a quick guide to help you match the paint to the project.
Tip: Always read the label. It’ll tell you what the paint sticks to, how to prep the surface, and how long to wait between coats.
General Purpose Spray Paint
Great for a quick refresh on furniture, small repairs, or craft projects.- Good for: Most indoor and light-duty outdoor jobs
- Use it on: Wood, metal, wicker, decor
- Why it works: Dries fast, easy to use, tons of color options
Rust-Preventive Spray Paint
Rust-Oleum Stops Rust is a popular pick in this category. It’s made to handle farm life and keeps gear from corroding in the elements.- Good for: Anything metal that lives outdoors
- Use it on: Fences, gates, trailers, tools
- Why it works: Fights rust and stands up to weather
High Heat Spray Paint
Don’t use regular paint on high-temp stuff – it won’t hold up. This is built for the job.- Good for: Surfaces that get hot
- Use it on: Grills, fire pits, engine parts
- Why it works: Handles extreme heat without bubbling or peeling
Specialty Surface Spray Paint
Make sure the label says it’s made for the material you’re painting. Some even skip the need for a primer.- Good for: Hard-to-paint materials
- Use it on: Plastic chairs, coolers, glass, vinyl
- Why it works: Bonds to slick or flexible surfaces
Textured or Decorative Finish Spray Paint
Perfect if you want something with more personality than plain gloss.- Good for: Adding style or a vintage touch
- Use it on: Planters, benches, signs, shelving
- Why it works: Comes in chalky, hammered, or stone finishes for extra character
Enamel Spray Paint
Drying takes a little longer, but you get a tough, lasting coat.- Good for: Heavy-use items
- Use it on: Toolboxes, machinery, outdoor furniture
- Why it works: Hard, glossy finish that resists chips and scratches
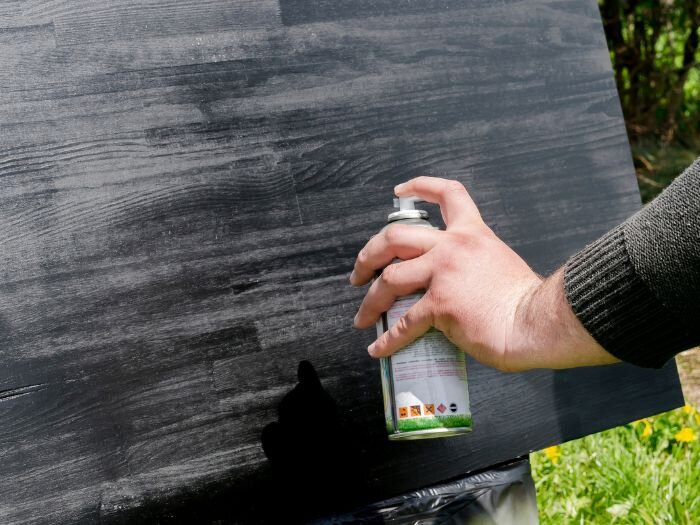
How to Use Spray Paint
These steps will help you get started, whether freshening up a rusty gate or giving an old bench a new look.
Tip: Practice on a scrap board first to learn how to adjust your spray pattern and keep the can moving to avoid drips. Once you get the hang of it, spraying paint is kind of fun.
Step-by-Step Spray Painting Guide
1. Prep your workspace.
- Work outside or in a well-ventilated garage.
- Lay down a drop cloth or cardboard to catch overspray.
- Wear a mask if you're in an enclosed space.
2. Clean the surface.
Dirt, grease, and rust will mess with how paint sticks.- To remove grime, use soapy water or degreaser.
- For rust, use a wire brush or sandpaper.
3. Sand rough spots.
- Lightly sand shiny or uneven surfaces to help the paint grip better.
- Wipe off any dust with a clean cloth.
4. Prime if needed.
- Use a primer first to paint bare metal, untreated wood, or plastic.
5. Shake the can well.
This mixes the paint and helps it spray evenly.- Give it a good shake for at least a minute after the ball starts rattling.
- Do this before you start and every few minutes while painting.
6. Start spraying.
- Hold the can 8–12 inches from the surface. Too close, and you’ll get drips. Too far, the paint will dry in the air before it lands.
- Begin spraying slightly before the object, and move smoothly across it in one pass, like you’re sweeping past the piece.
- Don’t stop mid-spray, or you’ll get drips.
7. Apply thin coats
It’s better to apply several light coats than one heavy one. Rushing the next coat can lead to cracks, bubbles, or peeling later.- Let each coat dry for the time listed on the can, typically 15-30 minutes.
Spray Painting Tips for a Professional Look
Getting a clean, even finish with spray paint doesn’t require fancy tools – it just takes a few smart techniques.
Overlap Your Strokes
One of the most important spray painting techniques is overlapping your passes. Aim for a 50% overlap – each new pass should cover half of the last one. This keeps the color even and avoids light or blotchy spots. Tip: Always keep the can or sprayer moving. Start spraying slightly before your surface and finish slightly past it. This avoids heavy spots at the edges.Prep Your Material the Right Way
How you prep the surface makes a big difference in how well the paint sticks and how long it lasts.- Metal: Sand off any rust or flaking paint. Use a wire brush for rough spots. Then wipe clean and apply a rust-preventive primer like Rust-Oleum Rusty Metal Primer. Focus on corners and joints where moisture collects.
- Wood: Sand the surface smooth, especially if it's bare or weathered. Use a primer if the wood is unfinished or has knots, which will bleed through the paint. Also, allow extra drying time between coats.
- Plastic: Use a cleaner that removes grease or wax. Lightly scuff shiny plastic with fine-grit sandpaper, and use a primer made for plastic to help the paint stick.
Don’t Skip the Primer
Priming helps paint go on smoother, last longer, and look better. It’s especially helpful when:- You’re painting bare surfaces (like raw wood or metal).
- The object had a dark or uneven finish.
- You’re working with tricky materials like plastic or aluminum.
Mask What You Don’t Want Painted
Before spraying, take a few minutes to protect anything you don’t want to paint. Use:- Painter’s tape for crisp edges
- Plastic sheeting or old newspaper to cover nearby items or areas
- Cardboard cutouts for quick DIY stencils or shields
Ready to Give It a Try?
 Spray painting doesn’t have to be complicated. With a little prep, the right technique, and the right kind of paint for the job, you can achieve a smooth, durable finish on just about anything.
Stop by your local Wilco Farm Store or order online to find trusted brands, quality paint sprayers, and all the tools to get the job done right.
And if you’ve got a before-and-after project you’re proud of, tag us on Instagram or Facebook – we’d love to see what you’ve been working on!
Spray painting doesn’t have to be complicated. With a little prep, the right technique, and the right kind of paint for the job, you can achieve a smooth, durable finish on just about anything.
Stop by your local Wilco Farm Store or order online to find trusted brands, quality paint sprayers, and all the tools to get the job done right.
And if you’ve got a before-and-after project you’re proud of, tag us on Instagram or Facebook – we’d love to see what you’ve been working on!Orders
Services
About
Your Wilco Store

Store Hours
Monday - Saturday 7am - 8pm, Sunday 9am - 6pm

Need Help?
For questions or help with online orders call: (888) 78-WILCO
Limited to stock on hand. Some items may vary from photos. Because of store size limitations or geography, some items featured may not be available in all stores but will be made available by special order during sale periods at advertised prices. All sale prices listed as “dollars off” or “% off” are discounted from our regular posted shelf price, not from discounts given with specialty, bulk or pallet pricing. Reseller and Drop-shippers must contact us for pre-approval to place orders with the intent to re-distribute.
© 2026, Wilco Farm Store